If your skin craves deep, lasting moisture that regular lotion cannot quite deliver, making your own whipped body butter is a small project with a big payoff. A simple blend of natural butters and oils creates a rich, protective layer that locks in hydration — no synthetic additives, no long ingredient list, and a texture like soft frosting that melts into the skin.
This guide walks through everything from choosing ingredients to whipping a fluffy, customised cream: the base recipe, the technique that makes the difference between smooth and grainy, variations for different skin types, and how to store it so it lasts. It is a satisfying weekend project, the kind of slow, hands-on ritual that fits beautifully into a weekly reset like the Sunday Reset Checklist for Home and Body.
Key Takeaways
- Use roughly one part solid butter to half a part liquid oil for a balanced, spreadable consistency.
- Melt butters and oils gently in a double boiler to preserve their nutrients.
- Let the mixture cool completely — one to two hours — before whipping, or it will turn grainy or stay liquid.
- Store body butter in an airtight container in a cool, dark place for up to three to six months.
- Apply to slightly damp skin after a shower to seal in moisture effectively.
- Patch test essential oils before adding them to a full batch.
Why Whipped Body Butter Works So Well
Whipped body butter is an anhydrous product — it contains no water at all. That matters, because the high concentration of natural butters and oils forms a protective barrier on the skin that locks in moisture far more effectively than a water-based lotion. Lotions feel lighter and absorb faster, but body butter is the better choice for very dry skin, rough elbows and heels, and winter months when the air itself pulls moisture from your skin.
Whipping the mixture incorporates air, giving it a light, fluffy texture that spreads easily and absorbs without the heavy, waxy feel of an unwhipped balm. The result is a cream that feels luxurious but costs a fraction of a shop-bought equivalent — and you know exactly what is in it. For the face, a lighter routine is the right call, such as the Glowing Skin Morning Skincare Routine; body butter is best kept for the body, where skin is thicker and drier.

Photo via homesteadandchill.com
Ingredients for Your DIY Whipped Body Butter
This recipe yields about 8 ounces of whipped body butter — enough for one standard jar. Choose unrefined butters where possible: they keep more of their natural nutrients and skin benefits than refined versions.
- 1/2 cup unrefined shea butter: deeply moisturises and soothes dry skin; the backbone of the recipe.
- 1/4 cup coconut oil: adds spreadability and a light, pleasant scent.
- 2 tablespoons sweet almond oil: rich in vitamins and easily absorbed, for extra nourishment.
- 1 tablespoon jojoba oil: closely mimics the skin’s natural sebum, helping balance rather than overload.
- 15–20 drops essential oil (optional): for fragrance and skin benefits — lavender, vanilla, and sweet orange are popular choices.
You will also need a double boiler (or a heatproof bowl over a pan of simmering water), a mixing bowl, an electric hand mixer, and a clean, dry airtight jar. Everything that touches the mixture must be completely dry — water in an anhydrous product leads to bacterial growth and spoilage.
Step-by-Step: Making Your Whipped Body Butter
Making whipped body butter takes about 20 to 30 minutes of active time, plus one to two hours of cooling. The cooling step is not optional — it is what makes the difference between a smooth, fluffy cream and a grainy disappointment.

Photo via blissoma.com
- Melt the butters and oils: place the shea butter and coconut oil in a double boiler over simmering water. Stir gently until fully melted, then remove from the heat. Gentle melting preserves the nutrients that high heat destroys.
- Add the liquid oils: stir in the sweet almond oil and jojoba oil while the mixture is still liquid.
- Cool the mixture: let it sit at room temperature for one to two hours until it becomes opaque and starts to solidify around the edges. For faster cooling, place it in the fridge for 30 to 40 minutes — but watch it closely so it does not harden completely.
- Whip until fluffy: transfer the cooled mixture to a mixing bowl. Using an electric hand mixer, whip on medium-high speed for three to five minutes until it is light and fluffy, like frosting. Scrape down the sides as needed.
- Add essential oils: add 15 to 20 drops of your chosen essential oil and mix on low speed for ten seconds to combine. Spoon the body butter into an airtight jar and store it in a cool, dark place.
Tips for a Perfect Whip
The single most important tip is patience with cooling. If you whip the mixture while it is still warm, it will stay liquid or turn grainy as the butters recrystallise unevenly. The mixture should be opaque and just starting to firm at the edges — soft enough to scoop, firm enough to hold a peak when whipped.
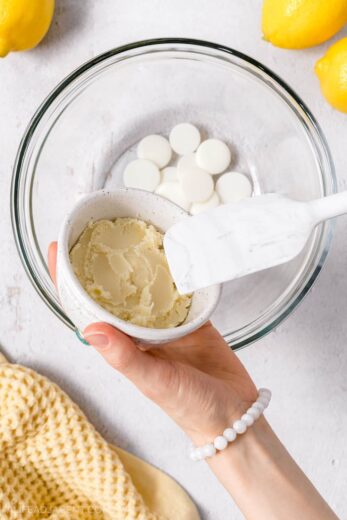
Photo via alifeadjacent.com
Apply the finished butter to slightly damp skin after a shower, when the skin is warm and the barrier is ready to lock moisture in. A little goes a long way — a coin-sized amount covers an arm or a leg. And patch test any essential oil blend on a small area of skin before full application, especially if your skin is sensitive. Gentle skin care works from the surface inward, and the same principle applies to exfoliation, as explained in Exfoliation: Physical vs Chemical for Skin — smooth skin absorbs body butter far better than a layer of dead cells.
Customising Your Body Butter: Variations and Add-Ins
Once the base recipe works, it is easy to adapt. Swap shea butter for cocoa butter for a firmer butter with a chocolate scent, or mango butter for a lighter feel that absorbs faster. Adjust the ratio of solid butter to liquid oil: more butter makes a firmer body butter, more oil makes a softer, more spreadable one. Keep the overall balance near one part solid butter to half a part liquid oil as a starting point.

Photo via getinspiredeveryday.com
For a less greasy feel, mix in one to two teaspoons of arrowroot powder or cornstarch per 8 ounces before whipping — it absorbs excess oil without reducing the moisturising benefits. Try different carrier oils for different skin needs: avocado oil for very dry skin, grapeseed for a lighter finish, or vitamin E oil for extra skin support. A jar of homemade butter also makes a thoughtful gift, especially paired with small self-care touches — a soft layer like the ones in Grey Cardigan Outfit Ideas for a Cozy Style or the plush comfort of Fleece Outfit Ideas for Cozy Comfort completes the cosy-night-in mood.
Storing Your Body Butter and Mistakes to Avoid
Store body butter in an airtight container to prevent oxidation and contamination. Keep it in a cool, dark place away from direct sunlight and heat, which can melt it and ruin the whipped texture. Never introduce water into the container — always use clean, dry hands or a small spatula. Without preservatives, homemade body butter typically lasts three to six months depending on ingredient freshness. If it smells off or changes colour, discard it.
Whipping too soon: the most common mistake. Warm mixture whips into a grainy or liquid mess. Cool it completely first.
Adding too much liquid oil: too much oil makes the butter soft, greasy, or unable to whip. Stick to roughly one part solid butter to half a part liquid oil.
Introducing water: wet utensils or wet hands in the jar invite bacteria. Keep everything bone dry.
Overheating ingredients: high heat destroys the beneficial properties of butters and oils. Melt gently in a double boiler, never over direct high heat.
A finished jar also deserves a neat presentation — clean nails and cared-for hands make the ritual feel complete, and a subtle finish like Natural Nail Designs With a Subtle Glow is a quiet complement to the whole routine.
Frequently Asked Questions
Can I use other butters instead of shea butter?
Yes. Cocoa butter gives a firmer butter with a chocolate scent, while mango butter is lighter and absorbs faster. Each butter has a different texture and melting point, so you may need to adjust the cooling time slightly.
How can I make my body butter less greasy?
Add arrowroot powder or cornstarch to the cooled mixture before whipping — start with one teaspoon per 8 ounces and blend well. It reduces the greasy feel without compromising the moisturising benefits. Using a lighter carrier oil such as grapeseed also helps.
Is it safe to use essential oils in homemade body butter?
Yes, in low concentrations and never undiluted. Research the safety of each essential oil for topical use, and always patch test on a small area of skin before full application. If irritation occurs, discontinue use immediately.
What is the difference between body butter and lotion?
Body butter is anhydrous — water-free — and made primarily from natural butters and oils, creating a thick, protective barrier. Lotion contains water and emulsifiers, making it lighter and faster-absorbing. Body butter is ideal for very dry skin or areas needing intense hydration.
Why did my whipped body butter turn grainy?
Graininess usually happens when the mixture is whipped while still too warm, so the butters recrystallise unevenly into a gritty texture. Let the melted mixture cool completely — until opaque and just starting to firm — before whipping.
Final Thoughts
For the best results, stick with the base recipe of shea butter, coconut oil, and sweet almond oil on your first try. You can expect immediate hydration that improves with regular use, and the whole project takes less than an hour of your time. Keep a jar in the bathroom and apply it right after towelling off, when skin is still slightly damp, for the smoothest and most effective moisture lock. Once you have made one batch, customising it becomes the fun part — and homemade never smells quite like anything from a shop.
Disclaimer: This article is for general informational purposes only and does not constitute medical or professional advice. Always perform a patch test before using new ingredients on your skin, and consult a dermatologist or healthcare provider if you have a persistent skin condition, an allergy, or a serious concern.